If you’re selling products online, there’s simply no way to overestimate the importance of product photography.
Photos set the expectations of potential customers – and high-quality ones say a lot more about your product than any written description ever could. Simply put, quality product photography on your site can be the difference between sale and… no sale.
That being said, you don’t need to spend a fortune on a professional photography shoot – you can do it yourself. Read on for the most crucial do’s and don’ts of product photography online.
Don’t Use Your Smartphone Camera
Let’s get this one out of the way right off the bat: don’t, for the love of all that is good, use your smartphone to take these photos. No matter what smartphone you have or how good the camera is advertised as, smartphone photos simply can’t deliver the high-quality images you’ll need for your website.
Think about it: these images will be displayed on high-res computer screens and you want to allow consumers to zoom in, out – whatever it takes for them to get the best view possible. Smartphone photos just aren’t up to this task.
Whether you have to buy, borrow, or rent a professional camera, it’s more than worth the cost to get professional-looking product photos for your site.
Do Invest in Quality Equipment
On the flipside, do invest in good equipment. That includes:
-
A professional camera
-
Lighting equipment
-
A tripod
If you’re selling a lot of stock online, it’s definitely worth the cost to invest in your own professional camera. You’ll use it repeatedly and the quality images will help you sell more product online.
You don’t need to spend thousands on a souped up camera, either. A standard digital SLR will do the trick – you can even find quality refurbished DSLRs online.
Don’t Over-Edit Photos or Use Filters
While you want products to look enticing in the photos on your website, you also need to keep in mind that these photos set buyers’ expectations about the product they’ll receive. Over-editing or using filters can create an unrealistic representation of the product – potentially creating unsatisfied customers.
Keep in mind that the core purpose of product photography is to show the product as near as possible to what it actually looks like sitting in front of you. Lighting and additional editing should all work toward this end.
Do Ensure Adequate Lighting
That being said, the fact is that cameras aren’t our eyes – they’re not as adept at reading shadows, reflections, colors and interpreting them into a realistic image. For that reason, you’ll have to go a little out of your way to ensure the proper lighting is used when you take product photos.
If possible, take photos as near a source of natural light as possible – large windows are perfect. It’s also important to ensure the light is originating from behind the camera. Light from behind the product or another angle can obscure the subject of the photograph in shadow.
Do Shoot Products in Front of a Blank White Background
If you do a lot of shopping online yourself, you’ve probably noticed that the vast majority of product photography consists of the product in front of a blank white background – and for good reason.
A simple background eliminates distraction from the product itself. And a clean, white background helps ensure proper lighting because the background reflects light, helping to illuminate features that might otherwise be in shadow.
For help creating the right setup for your shoot, check out Shopify’s Product Photography Tutorial.
Do Use the Right Camera Settings
Most digital SLR cameras come with a host of settings. They’re automatic enough for anyone to pick up and use and also offer the customizability a professional photographer needs.

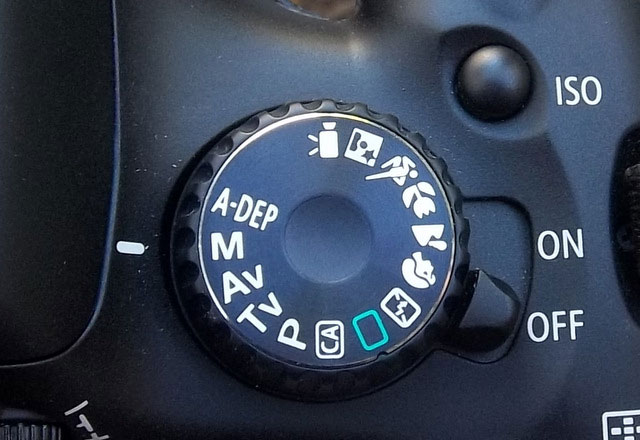
The camera should have a handful of modes – Landscape, Portrait, Sports, Night, etc. Portrait mode is most likely the best of the preset options for standard product photography. The ideal setting is Aperture Priority (‘A’ or ‘Av’ on the camera’s dial), but it does require some manual adjustment on your part.
To get a better handle on the available modes and how to use them, read Photography Life’s Understanding Digital Camera Modes.
Do Showcase the Product in Use
It’s great to show the product on it’s own so consumers can get a good look at what they’re actually buying, but it’s even better to show the product in use, too. Photographing the product as it’s being used allows potential customers to see how it functions.
Consider seeing a dress laid out on a table versus being worn by a model – there’s a big difference, right? Showcasing your product in use gives buyers more confidence in how it will actually work for them.
Shoot to Sell
High-quality and professional product photography is important for a business – especially one operating online. Don’t spend thousands on professional shoots. Just do your research, take your time, and follow the key do’s and don’ts above, and you’ll be moving some serious product in no time.
Do you have pointers on DIY product photography for other entrepreneurs? Share with us in the comments below.


